
Step 1: Navigate to the Pantry
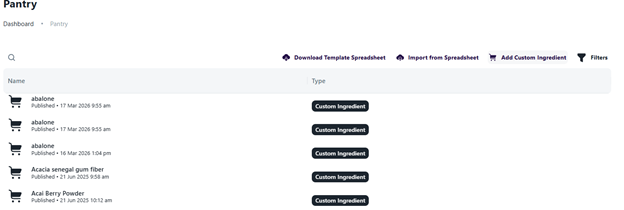
From your CoDeveloper dashboard, navigate to the Pantry page using the left-hand navigation menu.
Step 2: Select "Add Custom Ingredient"
At the top of the Pantry page, select Add Custom Ingredient. This will open the ingredient search page.
Step 3: Search for the Ingredient
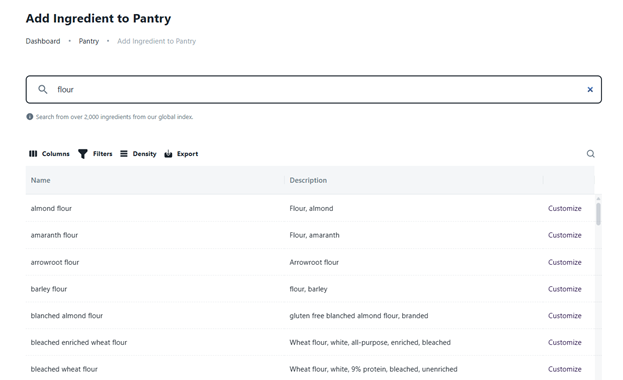
In the search bar, type the name of the ingredient you want to add. CoDeveloper will search across over 2,000 ingredients in the global database and display matching results. In the example below “flour” was searched for. If the ingredient you are trying to customize is in the list click the Customize button to the right hand side of that ingredient’s row.
Path A: Customize an Existing Ingredient
Step 4A: Select "Customize"
Find your ingredient in the search results and select Customize on the right-hand side of that ingredient's row. This opens a pre-populated ingredient details window.
Step 5A: Edit the Ingredient Details
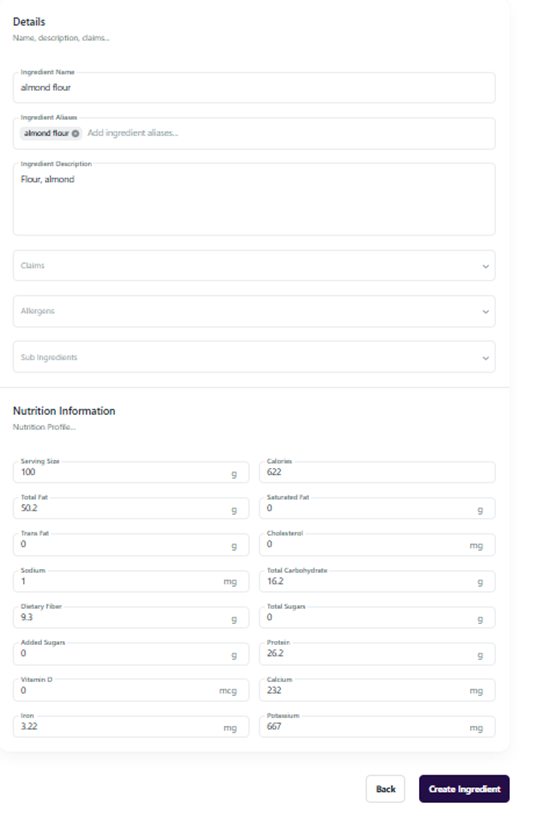
The customization window displays the ingredient's existing data, including:
- Ingredient Name and Ingredient Aliases
- Ingredient Description
- Claims, Allergens, and Sub Ingredients
- Nutrition Information (serving size, calories, fats, carbohydrates, protein, vitamins, minerals, etc.)
Update any fields as needed to match your specific ingredient specifications. By customizing an ingredient this way, Sous will understand the base ingredient's uses and functions while reflecting your custom modifications.
Step 6A: Save the Ingredient
Once you have finished editing, select Create Ingredient in the bottom-right corner. The ingredient will be saved to your Pantry.
Path B: Add an Ingredient Manually
Step 4B: Select "Add Manually"
If your ingredient does not appear in the search results, select Add manually in the bottom-left corner of the search page.
Step 5B: Complete the Ingredient Details
A blank ingredient details window will open. Fill out each section with clear, complete information so Sous can understand and use the ingredient correctly:
- Ingredient Name: Use the full, correctly spelled name (e.g., "almond flour" instead of "almd flr").
- Ingredient Aliases: Add any alternate names or search terms that your team might use to find this ingredient.
- Ingredient Description: Provide a brief, clear description of the ingredient.
- Claims, Allergens, and Sub Ingredients: Complete these fields if applicable.
- Nutrition Information: Fill out all available nutrition data as completely as possible.
Step 6B: Save the Ingredient
Once all fields are filled out, select Create Ingredient in the bottom-right corner. The ingredient will be saved to your Pantry.
Troubleshooting
| Issue | Solution |
|---|---|
| I cannot find my ingredient in the search results | Try alternate spellings or broader terms. If it still does not appear, use the Add manually option (Path B). |
| I need to edit a custom ingredient I created | Navigate to the Pantry, find the ingredient, and open it to make changes. |
| I need to edit a custom ingredient someone else created | Only the original creator can edit a custom ingredient. Contact that team member, or create your own custom version. |
| I need to add many ingredients at once | Use the Import from Spreadsheet feature on the Pantry page for bulk uploads. |